Progress Report

Once again it’s been a little while since we’ve sent out an update. Matt, Luke and I have all been re-balancing new jobs and other projects.

But the end is in sight!

The background scenes are done, the character animations are finished. We have a playable game that looks pretty decent. Here’s an example of what we’ve been working on: some simple animations to give a bit of life to this long lonely road.

roadanim.gif

So what’s left to do?

We’re still deciding how we’ll work the intro and outro. Making a video animation to open the game would be in line with some of the more classic games we’re inspired by. But we just don’t have the time and resources for it at this stage. So an in-game intro is looking much more likely.

Sound is another big thing we’re working on. We’ve got music and some stock sounds in place but Matt’s got some plans up his sleeve for developing sound even further. And of course voice acting needs to happen.

One of the last things we want to tidy up is the GUI – the menu bar, inventory etc – to really polish it up a bit.

In the mean time, work has started on our next project. At the moment it’s a lot of story and idea development. It’ll be a much bigger project, a real actual game. We’re not giving too much about it away yet, but we’re really excited. It will be much bigger, but the stuff we’ve learnt along the way will really help us out.


Moving along

It’s been a little while since an update, so I thought I would quickly post how we’re developing.

After much tinkering with our workflows (from creating assets, to getting them into Unity, to making sure they’re all working properly) we’ve finally settled on some basic practices that help the project along.

For one thing, now, when Luke’s designing the assets, he’s set up a template workstation that helps to keep all animations centred and starting from the same relative position no matter which direction they’re facing. This is really important – without this, animations can skip and flutter once they’re packed into the game. Obviously we need to be consistent with image dimensions and that sort of thing too.

There were a few little quirks with TexturePacker too, which slowed work down a little. For example, when we try to pack long animations in the largest dimension sprite sheets, the result is often a little glitchy. So we now multi-pack smaller sprite sheets to much better results.

These little fixes mean we’ve finally been able to move beyond designing animations for the player character. Matt was the first to be brought into digital life, and Luke experimented with a bit of hand-drawing the animation below. This will be part of a longer idle-cycle.

Smoking-Arm.gif

And to put it in context, see a rough .gif version of the finished product:

Matt-Smoke-2.gif

Skips and jumps

Sadly, the title of this post doesn’t refer to the progress we’ve been making. We have been making progress, but not as fast as we’d like.

One snag we’ve caught ourselves on has come up when paying closer attention to transitions between animations, and other quirks that have cropped up as we’ve really started working on things. We’ve found the character flipping directions at odd times, changing size, and generally skipping from one animation to another at bad times, making the transitions kind of glitchy.

Animator controllers in Unity are varied, and essentially they’re what tells Unity what conditions should cause an object to switch from one animation to another. In line with the tutorials in Adventure Creator and elsewhere, we’ve been Sprite 2D Toolkitusing the ‘Sprites 2D Toolkit’ animator engine. It really easily allows you to set up the basic animations you’d need for a 2D game. Animations like Idle, Walk, Run and Talk. It does this by essentially automating your animator controllers for you so you don’t need to worry about making connections between various activities.

In the image to the right you can see a list of animations, but there’s nothing really joining them to each other. That’s because the Sprite 2D Toolkit is doing the work for you.

But if you want to fine-tune these animations, Sprites 2D Toolkit seems pretty limited. We’ve added a Crouch and Use animation so far. And our default animation, Idle, does have a bit of life. Ensuring all of this works well together, without the odd jumps and skips, has been a bit difficult.

There are other types of animator engines – we’ve gone for Sprites Unity Complex. It gives you a lot more control over how Unity manages specific animations and how they relate to each other. Now, we’ve by no means mastered this tool yet. But one of the things Sprites Unity Complex allows you to do is create layers within animations. So if you want your character to wave, and to run, and to wave while running, you can just create the first two and set them to two different layers. This way, certain parts of a player will animate under certain conditions without effecting other layers.

OK so the running and waving sounds kind of boring. But what about if after completing a puzzle the player struts around for 20 seconds, or after running around for a while she gets puffed out. These are the kinds of things that really add life and depth to the game, and having control over this fine-tuning will have huge benefits further down the track.

Another thing the more complex mode does is allows you to create parameters that define when certain animations are triggered or not. So if the character’s speed goes above average, the run animation plays. Or you might have two different idle animations, which are triggered depending on certain circumstances (like one idle for normal gameplay and one for mid-conversation). This should (in theory – we haven’t tested yet) even allow certain animation types to be triggered within particular regions. Sprites Complex

Here’s a much messier animator controller. It does look more complex. But in reality the logic of these pathways is pretty intuitive. Each line between two of the boxes (the orange one is the default state) represents the conditions in which one animation will change to another. There’s no direct line between our Talk animation and our Use animation because it’ll never come up in-game.

For detailed tutorials you’ll have to go here but for the time being it’s enough to say that we’re very excited by the potential this opens up. And it’ll hopefully make our work look much smoother and complete. Worth the extra time!

Talking Games

luketalkWhat’s the point of making a game if you can’t share it with folk? And even better than sharing ideas and support with other indie developers? Playing their games too!

We’ve started hanging out on the Adventure Creator discussion boards, and also at TIGSource, both great locations to find out what people are up to and see some of their cool new work. There are a lot of games in development that we’re very excited to try out.

And speaking of speaking, as you can see Luke’s been busy animating. See the results.* In the meanwhile I’ve been plugging sprite sheets into our next build and Matt’s been developing audio. So maybe next time you see him speaking, you’ll be able to hear his pearls of wisdom!

*Accurate portrayal of Luke’s readiness to speak!

Initiating Phase 2 – Production!

Mark the date, 9th of September! The day we move into production phase!

This is very exciting for us. After quite a few more months than we anticipated, we’re finally ready to start pumping out the work.

Luke’s priorities are:

  • Create all sprites for all characters
  • Rigging (should be pretty quick with the Auto Rig function in DUIK)
  • Animating walk/run/talks/idles cycles for all characters as required.
  • Background Art
  • Object Sprites

Matt and I will do the packing and plugging into Unity. Possibly some animating as well, if we’re feeling game.

To recap, the workflow for animating will be:

  1. Create artwork in Photoshop
  2. Rig the artwork in After Effects using DUIK and Auto Rig
  3. Create each animation for walk cycles and so on.
  4. Pack those animations into a sprite sheet using Texture Packer
  5. Put the sprite sheet into either Sprite Illuminator or Sprite Dlite to create the normals map.
  6. Lay it all out in Unity.

That should be enough to keep us busy for a while.

Finally, here’s a screenshot from a pretty recent build:

Untitled

Hail Brave Adventurers!

I have a quest for a pair of hardy souls to undertake, if it be of interest to thee.

We shall give life to the unliving, through the dark art of… ANIMATION!! (thunder and lightning)

First, you must proceed to the storehouse known as Dropbox. Within, you shall find a folder marked with the inscription “Animation” and within it, another folder marked “Animation Tests”.

A series of images lies within the forsaken folder. From my studies I have come to believe that, assembled correctly, these images may unlock the final stages of the Great Work to which I have devoted what seems like a lifetime. If I am correct, then nothing will stand in our way to conjuring the sorcery known as Three Beards! (evil laughter)

But yes, the quest. First, you must take these images and find some way of forging them into a Sprite Sheet. Word tells of a mystical Sprite Packer by the name of Shoe Box. Locate this Shoe Box, or something akin to it and craft ye a Sprite Sheet.

Assuming you live to tell the tale, proceedest thou to learn what you can about Sprite Dlight. Do not be fooled. This is no elven ice-cream parlour, nor a fairy brothel as the name may suggest. It is in fact an engine of shiny magic and lights with which we will dazzle the WORLD.

Tinker with great heroism within Sprite Dlight, and on completion, export the Normals. For extra XP, you can also attempt to export the Occlusion and other maps. This is not crucial to our needs for now however.

With your unholy workings in your possession, go yonder through the gates of Unity. It is there you must assemble the pieces you have collected on your quest. Beware, there are many traps and snares which will undo all but the most wily and cunning of adventurers here.

Within Unity, you must Slice your Sprite Sheet in the Sprite Editor. The dimensions by which you must do thy slicing should be determined by the dimensions by which I have exported the frames.

You must also weave together the Sprites, Normals and Material, before conjuring a Light to illuminate our scene. To learn the intricacies of this truly alchemical process study the teachings of Youtube which I have referred to you in a previous missive on the topic of Sprite Dlight.

You may also need to scale the Sprites to fit the screen dimensions. Your judgement will serve you in this matter.

Finally, and at long last, place the sprites into the River of Time, which to mere mortals is known as the Timeline. At this point, roll a D20. If you roll 18+ restore your health to full: Time heals all wounds.
If you truly believe you are the Chosen One, you may also animate some basic movement in the light to show the dynamic application of our Lightomancy.
Gird-Up-Your-Loins-2
Now, the moment has come to fulfill thy destiny. Gird your loins*. Open the Game screen and press Play on the Timeline.

If you have been meticulous in your preparations, you will be immediately rewarded with the living spark of ANIMATION!!

If you have been sloppy and careless, you will open a portal to the 7th layer of Hell and immediately be transported there to wallow in your inadequacy for eternity.

In either case, let me know how you go.

Yours truly,
Luke
*Loin Girding instructions attached.

A few more animation tests

Alright, so here’s the next amazing test from the animation lab!Hairbounce

This is a test of the idea of combining frame by frame animation with puppet animation. It’s incredibly rough of course.

First gif I created some guides in After Effects. They are IK chains linked to the head, making each ‘strand’ of green blocks very easy to pose, then I added the same bounce I talked about in the last post hair-animate-test-finalto get a rough simulation of the hair responding to the movement of the character.

I exported that as frames, took it in to Photoshop and drew his beautiful blonde hair over the top of each frame, using the green blocks as position reference. The result is promising, despite being pretty crude. I have never really used the animation tools in Photoshop so I need to spend a bit more time with that to get more familiar with it.

The actual gif there was created in Photoshop just to show you guys the results. I need to work out how to get the hair frames back into After Effects in a method that won’t be laborious, but I’m pretty sure there’ll be a way to do that without too many problems.

One thing about this FxF animation- once we do it, we can’t tweak that animation at all, unless we wanna keep going back and redrawing individual frames (which we don’t!) so in terms of work pipeline, I’d say we animate the character fully without the FxF bits, then do those as the last touches on an animation. Again, we probably don’t want to do this on every character because it’s quite laborious.

Testing Animation in AE

Now we’ve gone to After Effects, it’s probably a good time to show some of the reason why.luke-bouncey

What you see here is the first animation test of the main things discussed in previous posts. It probably looks very basic, but it represents some very cool things. Luke reports:

So firstly, I rigged the character in After Effects with DuIK using the Auto-Rig function. Damn! This speeds things up so much. Basically you can import the Photoshop file straight into AE, drag all the sprites together in the composition window (the main animating window), set up your anchor points, label your layers, then press Auto-Rig and it’s done. There’s no need to slice up the sprite sheet or any of that nonsense, no need to set up and label a million bones, nothing.

Next up – check out the knees and elbows! Nice and neat and tidy. That’s probably just cause I spent more time getting the anchor points set up in the right spot, but it’s really easy to get that right, and since we’re saving time on the rest of the rigging process, there’s no reason not to take some extra time on that.

Finally, if you notice in the animation, at the bottom of his crouch he has a little bounce, and at the top when we stands up again there’s a bit of a stretch to him. Normally you would have to animate all those little movements that give the animation life. NOT ANYMORE!

Thanks to Motion2 all I had to do to get those secondary movements was drag him down to the bottom position, click a button to add the spring to that keyframe, then tweak some sliders. Boom, done. Copy & paste the keyframes from the first position to the end of the loop, add the bounce there and done.

That could really take our animations to the next level just in terms of smooth movement. It could also allow us to make quick motion guides for any frame x frame animation we want to do on a character, and because we can export the animation as frames straight into Photoshop, it means we can draw directly over the guide frames created in After Effects which will speed up that process dramatically as well.

Animation Step 4 – Sprite Lights with Sprite Dlite

There’s one final feature we really wanted to include in this game, and that’s to add lighting effects to 2D sprites.

The problem is that lighting in Unity (which is 3D) doesn’t ordinarily work that well with flat two dimensional objects. A flat surface is either lit or unlit – it’s difficult to create a sense of texture.

Of course there are tools that will do this for you. One we were keen to try out was Sprite Dlite.

Got it up and running today, and just done the first rudimentary tests, looks like it’s working as advertised!

I had a minor problem after download thanks (again) to Apple’s permissions, the Sprite DLight guy (Dennis) told us how to fix it.

So basically all we did was grab one of the old PNGs from one of the old walk cycles and dropped it in there, from there you can easily adjust the settings. We’ll have to spend a bit of time figuring out what combination of settings give the best results, but it shouldn’t be too hard.

From there, this video shows how to plug it in to Unity, it’s preeettty basic.

One of the main problems so far is that the shadows aren’t all that realistic in some places, but maybe there are ways to fix that.Screen Shot 2015-08-23 at 2.19.12 pm Screen Shot 2015-08-23 at 2.19.36 pm

The output is this ‘normal’ map – the garish bright colours on the right – and the result is on the left. The normals tell Unity how to throw the shadows and light.
Web Coder – makers of Texture Packer – also have Spite Illuminator, which does the same thing as Sprite Dlite. We’ll keep you posted on which one we end up with, but basically we’re pretty dang happy! Now we can establish a solid workflow – with a bunch of 3rd party software – to really move into the production phase of this build.

Animation Step 2 – Rigging (and the verdict on Puppet2D)

Step 2 in the animation process is going to be rigging up the individual body parts (after splicing them out of their sprite sheets) to a framework that will help with animation. First step was to learn some basics about animation, and this series was really helpful.Screen Shot 2015-07-12 at 10.49.51 pm

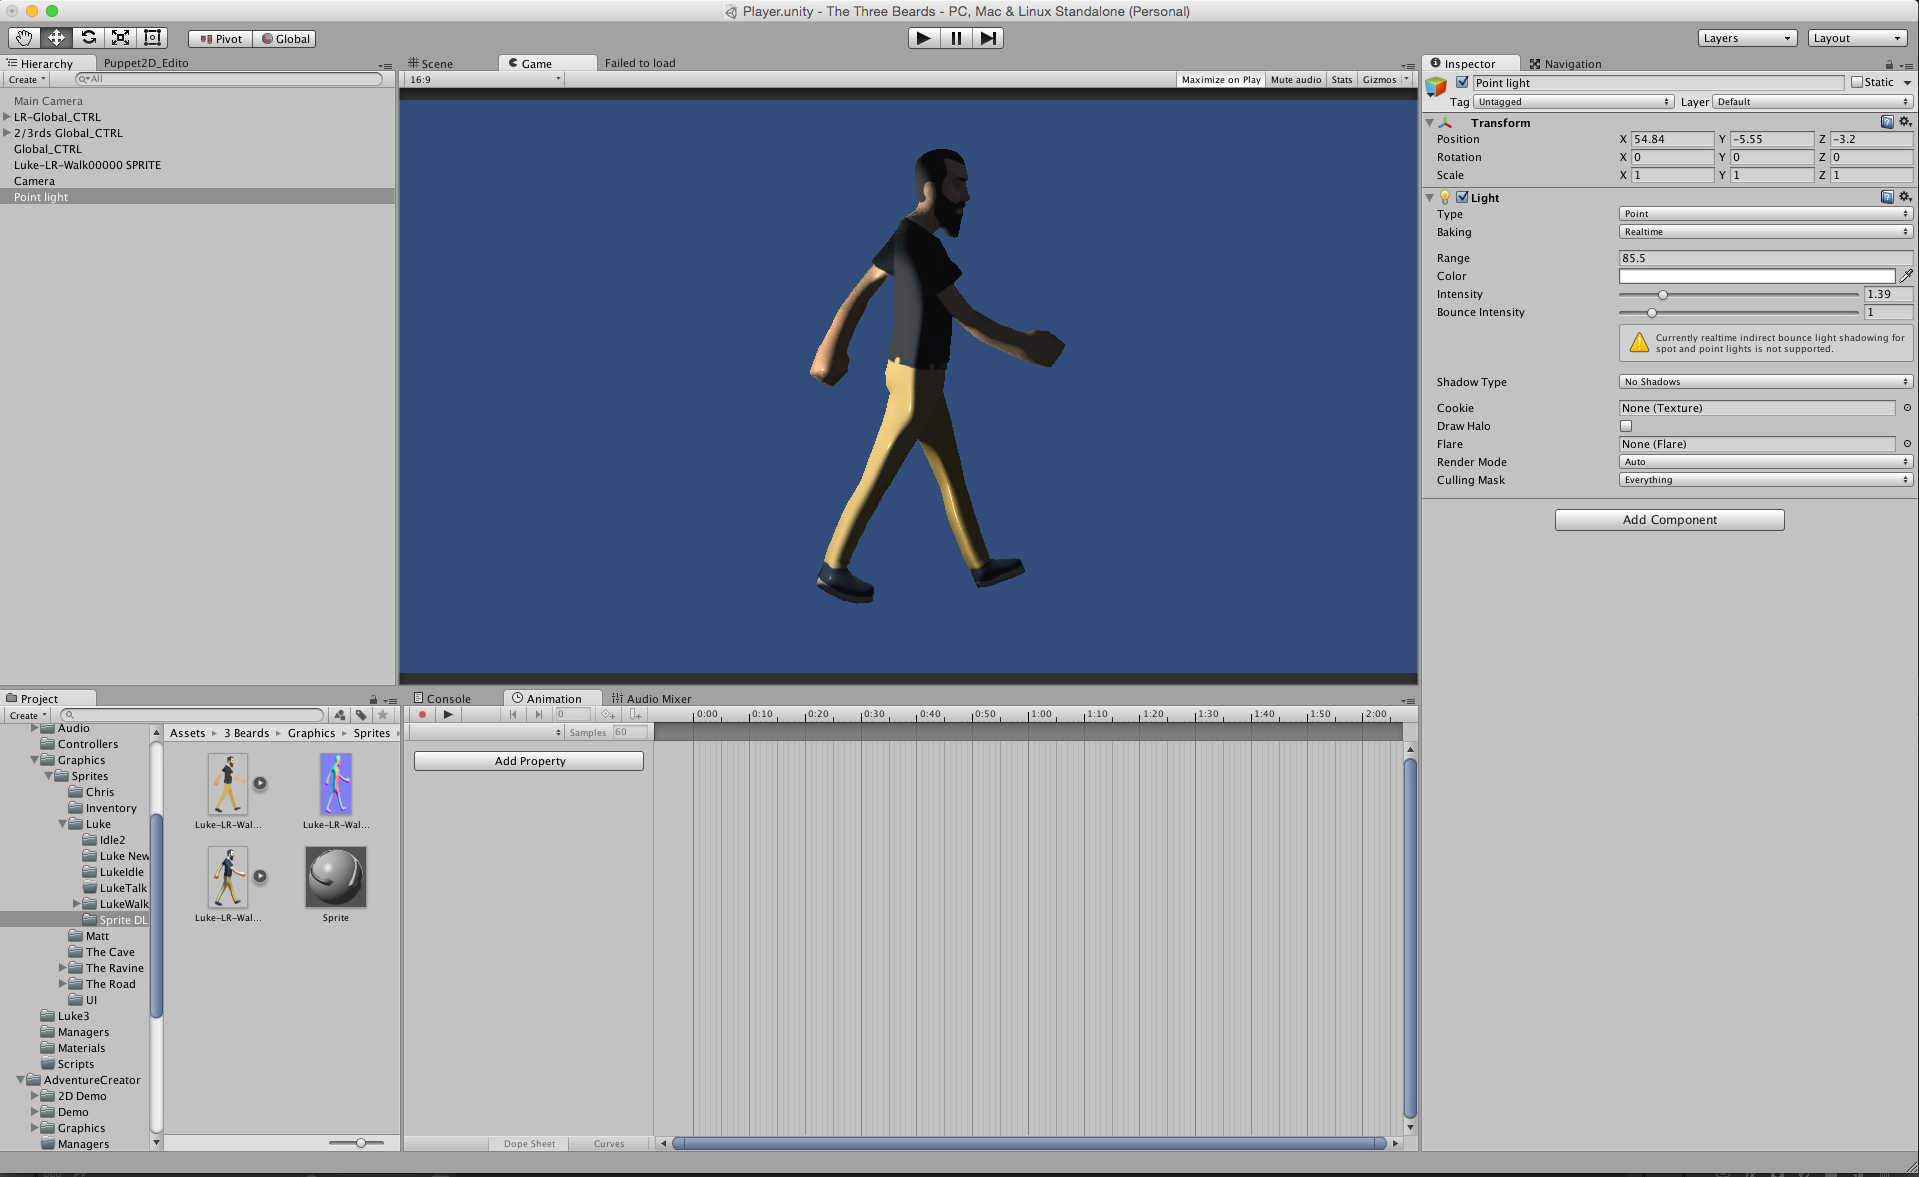
The key tool we first opted for in the process is Puppet2D (check out their website). Essentially, Puppet2D is a Unity plugin that allows you to attach sprites to an invisible skeletal form (i.e. rig the sprites to the bones) which is really useful for easily making animations.

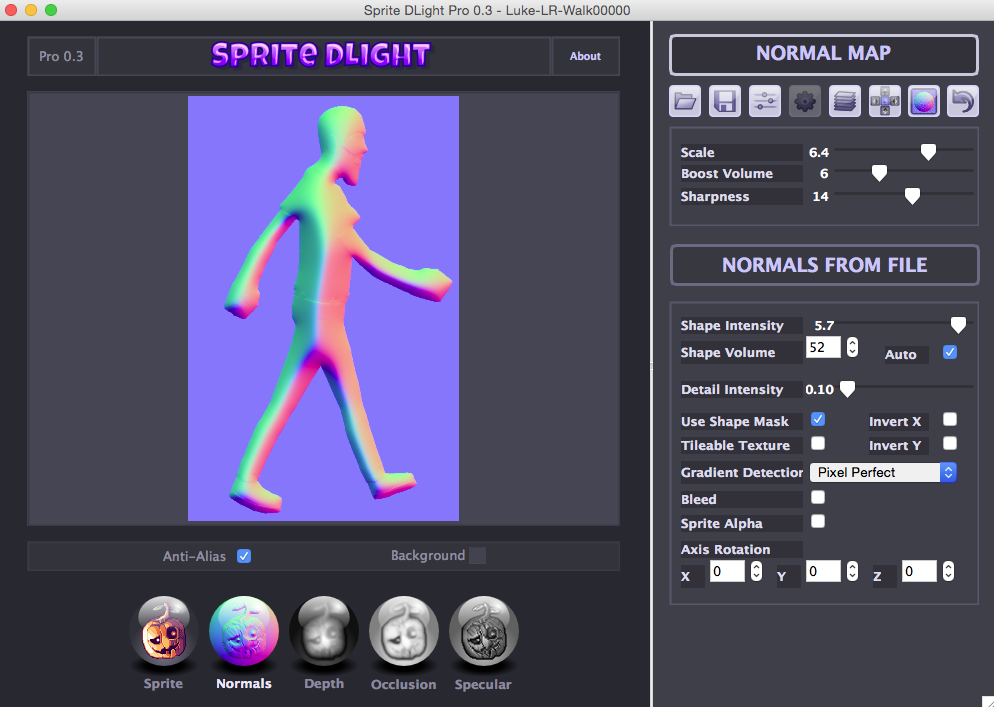
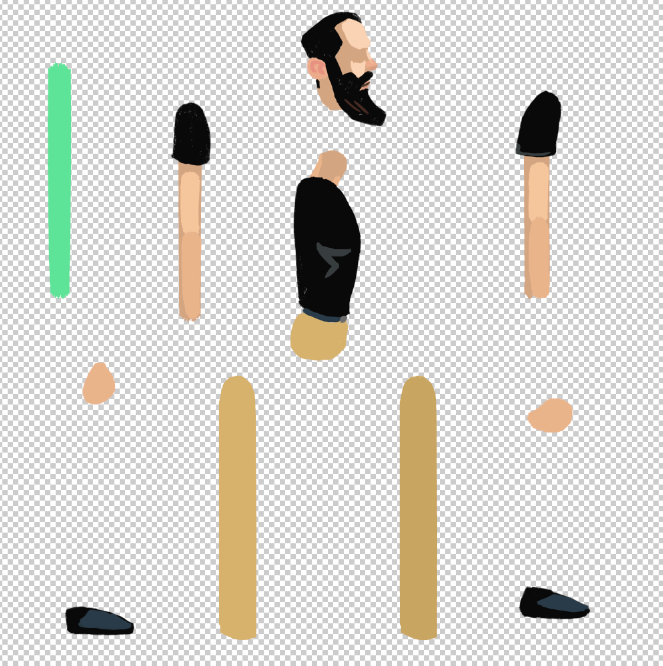
If you have a sprite sheet of an individual (like the one over to the right) you can attach each body part to a specific bone, and manage the animation by manipulating the bones. These bones are designed to link together and follow the physics of a real person. And with attached controllers, it’s pretty straight forward to move the sprites around like a strung up little puppet.
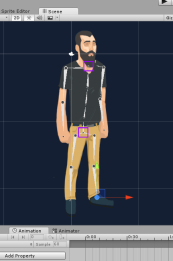
An old bag of bones

An old bag of bones

You’ll notice that in the sheet to the right, the legs and arms aren’t separated at the knees and elbows. With Puppet2D there’s a feature called mesh skinning, which allows you to morph the shape of the sprite as you work. It’s the kind of feature that’s really useful for creating quick facial expressions, or bends at the knees and elbows while walking or moving. This works by turning a sprite (2D image) into a mesh (3D skin) which can then be moved around.

The process with Puppet2D is important. Once you placed your sprites on screen, you lay the bones on top. It can be a little fiddly at first. Getting the layering correct in Unity is important, otherwise the process get’s a tricky (eg: the sprites should be on a layer that you can’t accidentally activate while clicking around on screen). Parenting the sprites to the relevant bones (torso connected to spine, arm connected to shoulder and so on) is critical because that’s how Puppet2D knows how to string the whole puppet together. But it’s an arduous task. There is a snap-to tool, but it seemed to often be not quite right and it takes almost as much time making sure there are no weird connections as it does to parent the sprites manually.

Then you lay controllers on top of the bones. There are the things that leg you rotate and move in the correct kinds of ways. In theory, you shouldn’t need to do anything to the sprites or the bones, once the right controllers are in place. If it’s all done correctly, you have yourself an in-Unity system to animate intuitively.

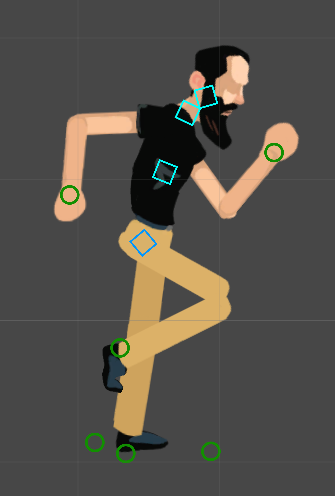
Unfortunately, though, we experienced a few other speed bumps with it. Once you start mucking around with the meshes, things can get a little strange. The meshes are ‘weighed’ and you can add or remove weights in order to control how it morphs. Except no matter how much we tweaked, there were some things we couldn’t quite get right. Have a look at the below two images.

Screen Shot 2015-07-12 at 9.12.06 pmScreen Shot 2015-07-13 at 1.10.34 am

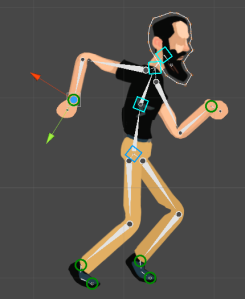
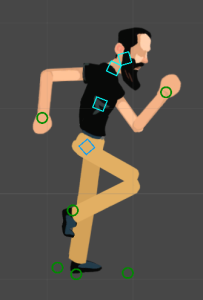
The one on the left has a single piece for each arm (like the example at the top) whereas on the right the arms were split into upper and lower arms. The problem we had with splitting the arms and legs up like that is the rigid puppet-like feel to the character when they move.

But see the weird kinks in the arms and legs of the sprite on the left? No matter how much tweaking with the weights we did, they never really disappeared. In the end we opted to work around it, and split the arms and legs at the joints.

With time and experimentation, it’s definitely possible to get Puppet2D doing what it says on the tin. Overall, we’ve been happy with it. BUT… actually animating in Unity is nicht so gut. Unity just doesn’t give you the same amount of control that something like After Effects does. It really slows down the animation process, and in this project we can’t afford to lose time on anything if we can avoid it. After some discussion, we’ve decided to look more into After Effects.

After Effects has a couple of tools that should speed the process up for us. Those tools are Motion2 and DuIK.

DuIK basically does what Puppet2D does but in After Effects. It has a couple of advantages though, one of them potentially a HUGE time saver – auto-rigging. Apparently this will rig the character in a single click. Luke’s keen to see how true that is, and whether there is much fiddling around involved to get that to work. But it could be a massive time saver.
Another thing with DuIK is a thing they call Rot Morph (Rotational Morph). Basically it’s a tool specifically designed to make the elbows and knees work properly, potentially solving the problem we had with Puppet2D.
Motion2 is a general workflow plugin for After Effects ($35). It does a bunch of things but essentially it is designed to speed up the animation workflow a lot. One of the things I think it’ll help us with is things like Follow Through & Squash & Stretch. It may also help us with smoothing out facial animations, though again that’d be something to experiment with.
One problem with switching to After Effects would be that we’d have to import each frame of an animation into Unity, which means files get large. But we’re looking into a more efficient way of doing that. Stay tuned.